1/31/2013


Please visit our new website!


Please head over there to see our Australia debriefing and browse our new spring classes!

12/13/2012

Wreathing: a tutorial

wreath_tutelage4

IMG_7676

We've had lots of people coming through making wreaths in our studios the last few weeks- it's been fun. So many of you have asked for a wreath making class; we thought we'd share a few wreath secrets and making tips online with you. I hope this translates on the Internet...here goes!

Making a wreath is similar to making an arrangement - you want to bring together a variety of textures, shapes and colors that compliment each other before you get started. This could happen from cuttings from your own yard. At our farm we pulled lots of tamarack cones,  various evergreens, dried queen annes lace and grasses for these wreaths. We added some of Fallon's beautiful pumpkin-like rosehips and a few special sheep bells from a client who was lucky enough to visit Majorca this past year. Anything goes! Lichen covered branches...artichokes from the grocery store...kumquats, tangerines. You can wire just about anything into a wreath.

wreath_tutelage3

wreath_tutelage1

The way I start most evergreen-based wreaths is a with a wire wreath form. You will also need a spool of wire (a medium gage is best) and a pair of snips or clippers. 

Start by mounding a fistful of green clippings on the bottom of the form. 
While you hold the first bunch on, start pulling the wire around the bunch and form; looping the wire through the center of the wire form (see above photo). No need to cut the wire - you're going to keep wrapping it around the form and greens until the whole circle is complete.

wreath_tutelage2

IMG_7701


When you're done with your base-wreath or foundation, you can start adding a second layer of greens and/or some of the doo-dads you've collected to decorate the wreath. This is the fun part. 

I like to concentrate my fancier botanicals toward the bottom of the wreath, letting them sort of spray out horizontally like a big collar. Do yourself a favor and clean up your stems; clipping off thorns and cutting the end of the stem at a sharp angle. This will make it easier to poke, jam or ease your pieces in. If you've made a nice tight base with your greens and wire, then a lot of your second layer material can just be tucked into your base without needing it's own wiring. Heavy pieces like the tamarack branches you see above I would wire in. No one wants junk falling out of a wreath when someone slams the door!

IMG_7756

IMG_7728


Of course, there are more than one ways to skin a cat! You could evenly distribute your materials around your wreath. Or make the big statement at the top. Keep in mind where your wreath will hang -- I have a bad habit of making big wild wreaths that later need to be trimmed back heavily in order to avoid poking people in the eye as they walk through a doorway.

IMG_7795


The last step would be to wire in big pinecones or ornaments. And of course the right ribbon! You can slip wire right through the knot of a bow to adhere it around the bottom of the wreath. 
We’d love to see what you make-- send photos!

 MERRY CHRISTMAS AND HAPPY HANUKKAH!

wreath_tutelage5

11/30/2012

Little Flower School in The City of Angels

Little Flower School

Winter Masterpiece Class
Downtown Los Angeles
Saturday, January 5th 2013
1-4pm

In this open level class, students will learn the basics of arranging in the Little Flower School style using seasonal California-grown product. Ranunculus, anemones, citrus, scented geranium and gardenias will constitute a majority of the stems used to build low, sprawling and lush centerpieces. Emphasis will be placed on color blending techniques and using a variety of textures and scent to create complex gestural arrangements. Participants will leave with knowledge of basic floral preparation practices, the concepts of layering and form and handy tips on how to gather the necessary materials to create masterpieces on their own down the road. Limited to 20 students.

Clippers, vases, flowers & refreshments included.
$450
REGISTER HERE

Little Flower School

11/22/2012

AUSTRALIA: WEDDINGS 101


sydney_weddings3

sydney_weddings1

WEDDINGS 101
Sydney, Australia
January 12-13, 2013
10am-5pm 

This is an intensive weekend-long symposium for those looking to further their floral work specifically in the realm of weddings and events. Individually 
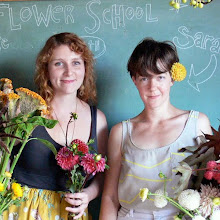
in their own respective floral studios Sarah and Nicolette have designed and produced hundreds of weddings and parties. Their goal in this advanced level class is to share the methodology, tips, and tricks that have made their studios successful. Topics covered include:

Planning...
In a relaxed round table approach, we’ll discuss client relations, consultations, proposal writing, budgeting, and the art of working with wedding planners.

Preparing...
Nicolette and Sarah will share case studies of events and review practices on flower budgeting and ordering. In addition, they will discuss in depth the advantages of working seasonally, share tips on flower conditioning (and when not to condition), ideas for containers, and discuss props and rentals.

Making...
A large portion of the weekend will be devoted to hands-on floral lessons. Nicolette and Sarah’s wedding designs are known for their loose, romantic and somewhat unstructured approach. Special emphasis will be placed on the nuances of layering color and texture.

Lessons included: The art of composing distinctive bridal bouquets (students should expect to make a bouquet, and then make it again) building centerpieces, crafting boutonnieres, tricks for constructing hair pieces and crowns, and techniques for avoiding wrist corsages.

The weekend’s work will finish Sunday afternoon with a photo session aimed at capturing student’s hard work for their portfolios.

Cost of workshop including materials, lunches and coffee breaks is $2,600

Limited to 12 students.
sydney_weddings2

AUSTRALIA: Flower Arranging 101


Summer Down Under: Flower Arranging 101
Monday January, 14 2013
5:00pm-8:00pm
$500

In this class we'll introduce the techniques and approaches to creating lush and wild arrangements in the Little Flower School style. Emphasis will be placed on building loose, gestural compositions that focus just as much on the negative space as the more densely layered flowers. We'll discuss construction techniques, color blending and the importance of scale. All materials and refreshments will be provided. Class is limited to 20 students.
REGISTER HERE.


11/07/2012


We hope everyone is safe and well after all of the hurricane sandy melee.

We are putting together our Winter & Spring class schedule here at Little Flower School.  New classes are coming soon, promise! 
Please sign up for our mailing list so you'll hear of all upcoming classes.
See you soon.


8/09/2012

Untitled

I was digging around in my photo archives today when I found these images from our Dutch Masters Class that took place this past spring. I know it has been a while since we've updated, please forgive us!

Nicolette and I have a few ideas about new ways of teaching. We're not ready to release anything just yet - but in the meantime, here is a tease of classes coming out for the end of 2012 and 2013...

-September 9th at the New York Botanical Garden; Sign up starts Monday on their website.
-November we're traveling to Tacoma for the ASCFG conference and might throw a class together in Seattle or Portland...
-December we're going to Australia to teach
-January we'll be back in the city with a winter class
-February we'll make our second annual Valentine pop up shop...somewhere.
-This Spring we'll be on the west coast for our annual California tour

So there it is, our wish-list. We will try our hardest to make all these happen. There's a lot on both our plates right now but teaching with the Little Flower School is the one thing we do collaboratively and it's too much fun to let slide...plus I like the snacks.


Untitled

Untitled

Untitled

Untitled